Shutter Speed, Aperture, and ISO
Understanding exposure is fundamental to photography, as it determines how light enters the camera and ultimately affects the quality of your images. In this guide, we’ll explore the three key elements of exposure—shutter speed, aperture, and ISO—and how to adjust them to achieve the perfect exposure in your photos.
1. Shutter Speed:
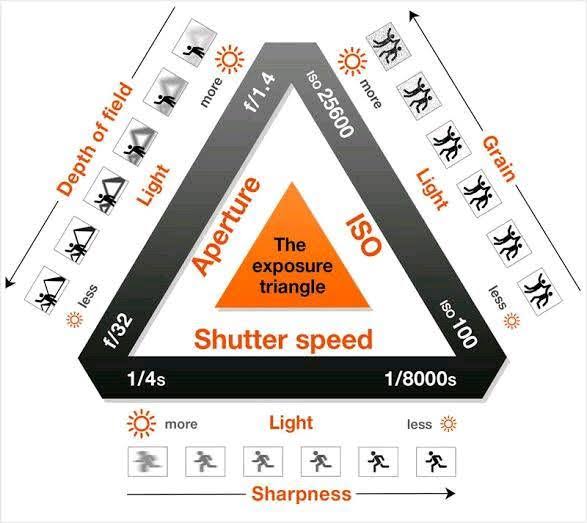
Shutter speed refers to the amount of time the camera’s shutter remains open to allow light to reach the camera sensor. It controls the motion blur in your photos and is crucial for capturing fast-moving subjects or creating long-exposure effects.
Fast Shutter Speed (e.g., 1/1000s and faster): Use fast shutter speeds to freeze motion and capture sharp images of moving subjects, such as sports or wildlife photography.
Slow Shutter Speed (e.g., 1/30s and slower): Slow shutter speeds are ideal for capturing motion blur and creating artistic effects, such as light trails or silky waterfalls.
To adjust shutter speed, use your camera’s manual mode or shutter priority mode (usually denoted as “S” or “Tv” mode). Dial in the desired shutter speed, and the camera will automatically adjust the aperture to maintain proper exposure.
2. Aperture:
Aperture refers to the size of the opening in the lens through which light passes. It controls the depth of field in your photos, determining how much of the scene is in focus.
Large Aperture (e.g., f/2.8 and wider): Use large apertures to create a shallow depth of field, blurring the background and emphasizing your subject. This is great for portraits or isolating a subject from its surroundings.
Small Aperture (e.g., f/11 and narrower): Small apertures increase the depth of field, keeping more of the scene in focus. This is useful for landscape photography or when you want everything in the frame to be sharp.
Adjust the aperture using your camera’s manual mode or aperture priority mode (usually denoted as “A” or “Av” mode). Select the desired aperture value, and the camera will adjust the shutter speed accordingly to maintain proper exposure.
3. ISO:
ISO measures the sensitivity of the camera sensor to light. A higher ISO allows you to shoot in low-light conditions but can introduce noise/grain to your photos, while a lower ISO produces cleaner images but requires more light.
Low ISO (e.g., ISO 100): Use low ISO settings in bright conditions to maintain image quality and reduce noise.
High ISO (e.g., ISO 800 and above): Increase ISO in low-light situations to capture properly exposed images without sacrificing shutter speed or aperture settings.
Adjust the ISO manually or use your camera’s auto ISO feature, which automatically adjusts the ISO based on the available light and your chosen shutter speed and aperture settings.
Mastering exposure takes practice, but understanding how shutter speed, aperture, and ISO work together will empower you to take control of your camera and capture stunning images in any situation. Experiment with different settings, explore creative techniques, and don’t be afraid to push the boundaries of your photography. With patience and persistence, you’ll unlock the full potential of your camera and unleash your creativity behind the lens.

Would you like to share your thoughts?